
Seed Cycling Plan for Fertility & Hormone Balance in IVF Treatment

 Seed cycling is a natural way to balance hormones, support ovulation, and prepare the body for implantation by consuming specific seeds during different phases of the menstrual cycle (or in case of IVF, before and after embryo transfer).


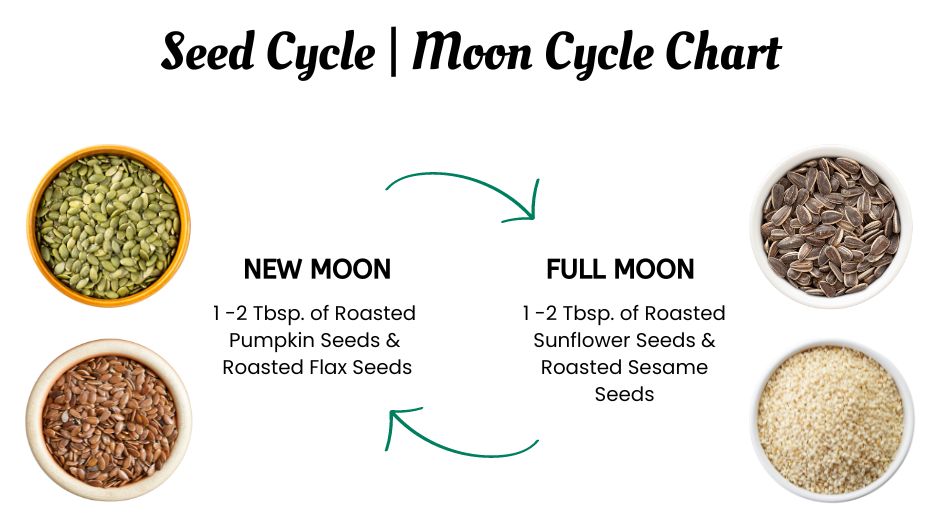
🌿 Phase 1: Follicular Phase (Day 1 to Ovulation or Before Embryo Transfer)

✔ Seeds to Eat: Flaxseeds & Pumpkin Seeds (1 tbsp each per day)
✔ Why?

  • Flaxseeds help regulate estrogen levels and support egg quality
  • Pumpkin seeds are rich in zinc, essential for progesterone production later
  • Both contain Omega-3 fatty acids, which improve uterine blood flow

✅ How to Eat?

  • Add to smoothies, sprinkle over dosa batter, or mix with curd
  • Dry roast and eat as a snack
  • Blend into nut butter or chutneys

⛔ Avoid processed flaxseed oil – use whole seeds for best results


🌼 Phase 2: Luteal Phase (Post-Ovulation or After Embryo Transfer)

✔ Seeds to Eat: Sesame Seeds & Sunflower Seeds (1 tbsp each per day)
✔ Why?

  • Sesame seeds boost progesterone, which is critical for implantation
  • Sunflower seeds are rich in Vitamin E & selenium, reducing oxidative stress and supporting the uterine lining
  • These seeds prevent inflammation and help in embryo attachment

✅ How to Eat?

  • Mix into coconut chutney
  • Sprinkle on idlis, chapati, or salads
  • Blend into energy balls with jaggery

⛔ Avoid excessive sesame if prone to acidity


⏳ How Long to Follow Seed Cycling?

  • For natural conception: Start seed cycling from day 1 of your menstrual cycle
  • For IVF/FET cycles:
    • Follow Flaxseeds & Pumpkin Seeds until embryo transfer
    • Switch to Sesame & Sunflower Seeds after transfer

🌟 Final Tips

✅ Use organic, raw, or lightly roasted seeds
✅ Drink plenty of water to aid digestion
✅ Continue post-transfer seeds throughout the 2-week wait (2WW) for better implantation chances

Disclaimer

The information provided in this blog is for educational and informational purposes only and is not intended as medical advice. While every effort has been made to ensure accuracy, the content is based on general research, nutritional principles, and personal insights.

Individual health conditions, fertility treatments, and dietary needs vary from person to person. Always consult with your fertility specialist, doctor, or a registered dietitian before making any changes to your diet, supplements, or treatment plan, especially during fertility treatments like IVF, IUI, or embryo transfer.

This blog does not claim to diagnose, treat, cure, or prevent any medical conditions. The author and publisher are not responsible for any adverse effects resulting from the use of the information provided.

If you have any specific medical concerns, please seek professional medical advice from a qualified healthcare provider.

Comments

Popular posts from this blog

What is the Optimal Progesterone Level a Day Before Embryo Transfer?

For a Frozen Embryo Transfer (FET) , the ideal serum progesterone level one day before embryo transfer depends on whether progesterone is given via injections, vaginal tablets, or both. 📌 Ideal Progesterone Levels (One Day Before Embryo Transfer) ✅ Above 10 ng/mL (30-40 nmol/L) if taking progesterone injections . ✅ Above 10-15 ng/mL (30-50 nmol/L) if using vaginal progesterone (Susten 400mg). ✅ Below 1.5 ng/mL (5 nmol/L) before starting progesterone – If progesterone was not started at the right time, high levels before transfer might indicate early exposure, which can affect implantation. 🚨 Why Is Progesterone Important? ✔ Supports endometrial receptivity – Ensures the lining is ready for implantation. ✔ Reduces uterine contractions – Prevents early embryo dislodgment. ✔ Prepares for pregnancy maintenance – Prevents early miscarriage risk. 📌 What If Progesterone Is Low Today? 🔹 Below 10 ng/mL? – Doctor may increase progesterone injection dosage or add vagina...

Pre-Embryo Transfer Supplementation Guide

 To improve embryo implantation, uterine receptivity, and pregnancy success , the following supplements are recommended at least 4–8 weeks before embryo transfer . Key Supplements for Pre-Embryo Transfer 1. Vitamin D Dosage: 2000–5000 IU daily Best Form: Vitamin D3 (Cholecalciferol) Why? Enhances endometrial receptivity and implantation rates . Food Sources: Sunlight, salmon, egg yolk, fortified dairy. 2. Vitamin B12 Dosage: 1000 mcg daily (Methylcobalamin form preferred) Why? Supports embryo development and uterine blood flow . Food Sources: Meat, fish, dairy, eggs. 3. Folate (Vitamin B9) Dosage: 400–800 mcg daily (as Methylfolate, NOT Folic Acid for better absorption) Why? Reduces chromosomal abnormalities and improves implantation . Food Sources: Leafy greens, beans, citrus fruits. 4. Iron (Ferritin Levels Below 50 ng/mL) Dosage: 30–60 mg daily (if deficient) Best Form: Ferrous Bisglycinate (gentle on stomach) Why? Supports oxygen delive...

How Long Does it Take for a Day 5 (Blastocyst) Embryo to Implant?

Implantation timing depends on the stage of the blastocyst at the time of transfer. Here’s a general guideline: Approximate Timeline for Blastocyst Implantation Blastocyst Stage at Transfer Implantation Timing Days Post Transfer (DPT) Day 5 Blastocyst (Expanded or Hatching) 24–48 hours 1–2 Days Post Transfer (DPT) Day 6 Blastocyst (Hatching/Expanded) 12–24 hours Same Day or 1 Day Post Transfer (DPT) Since your blastocyst was transferred at 12 PM , implantation typically occurs: ✅ Between 1–2 days post-transfer for a Day 5 blastocyst (approx. next day 12 PM to 48 hours later ). ✅ Within 12–24 hours for a Day 6 blastocyst (possibly even same evening or next morning ). Key Factors Affecting Implantation Timing Endometrial Receptivity (thickness, progesterone levels). Blastocyst Quality (grading, hatching status). Uterine Environment (blood flow, inflammation). Signs of Implantation (2-5 Days Post Transfer) 🔹 Light spotting (implantation bleeding). 🔹 Mild cram...